An IIIT student and a hardcore Manchester United fan using this blog to spend his time writing articles on things that are interesting

Saturday, March 20, 2010

10 things to do during load shedding

I am always on the look out for new topics to write on for my blog. Besides the PSD tutorial series I am doing, I wanted to do something more entertaining so I started thinking about fun topics to write on about, and wallah ,not exactly on a train trip as for JK Rowling with the Potter series but all the same in a bike from Thamel to my house popped an idea. Kathmandu in recent days has started to suffer from 12 hrs of load shedding. So I thought why not write an article on interesting things to do during the 12 hrs of gracious rest time our beloved dis-functional government provides us with.
Here goes the list:

10. Eat the ice cream/drinks in the back of the freezer :
It's going to melt anyway, It’s a tough job but someone has gotta do it.
9. For that matter eat every biscuit, cake, and piece of fruit in the freezer
Remember our government gives us 6 lightless hours. The food has better chance in your belly then in the freezer.
8. Indulge in a little amateur astronomy:
Look up at the sky and the stars, Kathmandu has little light pollution, as well, let’s say the government is worried about energy consumption and is saving energy for the whole world.
7. Speculate Facebook:
Start wondering what your fortunate friends(with light) have started posting on your facebook wall.
6. Play Snake on your mobile:
Yes, it's true that your mobile phone might be the only reliable alarm clock left in the house and that if the outage continues after bedtime there's no reliable means of rousing yourself for work the following morning, but there's no better use of your limited battery power than testing your reflexes against the ubiquitous and addictive Nokia serpent-steering game.

5. Try playing the guitar or any other musical instruments:
Pick up any musical instrument and start learning it. 12 hrs practise a day will make you a great artist. Blimey! If we all do this Nepal might be a great music nation.

4. Read a book:
If you're on your own, you'll find a quiet read by candlelight is a quite distinct experience. If you don’t like it, get used it. ELECTRICITY AINT CUMING SOON TO NEPAL. I recommend Mario Puzzo, Dan brown and Sidney Sheldon.

3. Take a Nap:
Go sleep the Nation encourages it.

2. Candle Light Dinner:
Plan a candle light dinner with your loved one. Real romantic and will save you a fat load of cash spent on restaurants.

1. Start the generator/inverter in the garage, you lazy ass and resume normal activity.

If you got any better ideas please comment. Will help all the valley denizens spend their time in this dark period.

Thursday, March 18, 2010

From photo to an oil painting

This is my second tutorial in my blog series of photoshop cs4 tutorials. We started up with something simple as the snow effect and now i thought we should turn up the notch a bit and try and do something a bit difficult. At the end of this tutorial you should be able to transform your photos into an oil painting. The picture below illustrates this transformation.


As my workpiece I have chosen the picture of Indra Chowk in Kathmandu Durbar Square.
Lets get started now.
Step 1: Open the picture in photoshop and duplicate the background layer.


Step 2: Use the Smart Blur option. Go to Filter>Blur>Smart Blur> set the Radius and Treshold to 100(or something like that), Quality: Low, Mode: Normal


Step 3: Again duplicate the background layer and place it above the other two layers. Then go to Filter>Artistic>Poster Edges,Edge Thickness:1, Edge Intensity:2, Posterization:0- for this picture I've found that these settings are the best,but it can vary for another picture- you choose what's the best.


Step 4: Right click on this layer and chose Blending options then set the blend mode to luminosity and the Opacity to about 70%.


Step 5: Duplicate the background layer again and name it duplicate 2. Place this layer between the other two duplicate layers. Then go to Filter> Blur> Smart Blur, set the Threshold high, Radius something about half, Quality: High, Mode: Edge Only, then go to Image> Adjustment> Invert, Soft light, Opacity 45%


Step 6: Duplicate the layer duplicate 2 and go to Filter> Blur> Gaussian Blur, and set the to about 3,5 and then set the Opacity to about 80%


Step 7:Get back to the layer Duplicate,click on Image> Adjustments> Levels and adjust the sliders as you wish to make the "drawing" darker or brighter


Step 8: Then go to Filter> Sharpen> Unsharp Mask and set the Amount,Radius and Threshold to accent some lines on the "painting" and that's it!


Enjoy

Tuesday, March 16, 2010

Create the Snow Effect

Hey guys, am back. Have been studying for my exams so my blog well was swept aside. Anyhow, I am back to my blog and well I received a lot of complaints from my dear friends that I have just been writing about my team Manchester United and nothing else. So I thought I would come up with something creative and hence I have started this tutorial series for Adobe Photoshop CS4. I have started this tutorial series with a fairly easy job of creating this snowy effect. So let’s get started. I thought about how we enjoyed the snow in the valley 3 yrs earlier and thought about creating the image and took a picture of Basantapur as my workpiece photo.


Let’s try and add a little snow to it.

Step 1:

First use the clone stamp tool to remove the sites name where I took the logo from. Then As usual, begin with pressing CTRL-J to duplicate “Background” layer. That will let you have a “backup” of the original image if something goes wrong


Step 2. Create “Snow” layer filled with white.

Press CTRL-SHIFT-N to create new layer. Give it a name “Snow”.

Press SHIFT-F5 to fill new layer with white.


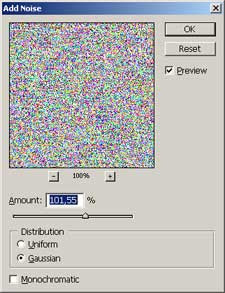
Step 3. Fill “Snow” layer with noise.

Select Filter – Noise – Add Noise.

Set Noise Amount to 100-150%, Gaussian distribution, Monochromatic NOT checked.


Step 4. Increase noise size.

Press CTRL-A to Select All, then CTRL-T to Transform.

Use numeric input in the upper part of the window, set vertical and horizontal scale to 150-200%.


Step 5. Set blending mode of “Snow” layer to “Screen”.


Step 6. Convert noise to snow.

Use Image – Adjustments – Threshold. Set Threshold amount to 200-240, depending on how much snow you want.

Select Filter – Blur – Gaussian Blur. Set Radius to 0,5 – 1 pixels. Do not blur snow too much at this step.

My values are: Threshold – 243, Gaussian blur – 0,6 pixels.


Step 7. Make snow fall.

Select Filter – Blur – Motion Blur. Set Distance to 8-12 pixels and try various directions.


Step 8. Ideas for further adjustments.

Image after some editing:


  • Create “Snow – 2″ layer for small-sized snow using technique explained above, but do not increase noise size (as in Step 4) and set Threshold to 230-240 to have little amount of snow.
  • Try to set opacity of “Snow” and “Snow – 2″ layers to 60-80%.
  • Make some areas less “snowy”. There are two ways to do that, “simple” and “advanced”. Simple way is to use Eraser tool in Brush mode with opacity set to 20-30% and remove snow from areas where it is unwanted.

    Advanced way is using layer mask; it’s non-destructive as you do not delete anything but simply hide it. Select
    Layer – Layer Mask – Reveal All, then take large soft brush, set brush opacity to 20-30%, press D to set foreground color to black and paint over the areas where you want to hide snow. Set brush color to white to reveal snow again.