Hey guys, am back. Have been studying for my exams so my blog well was swept aside. Anyhow, I am back to my blog and well I received a lot of complaints from my dear friends that I have just been writing about my team Manchester United and nothing else. So I thought I would come up with something creative and hence I have started this tutorial series for Adobe Photoshop CS4. I have started this tutorial series with a fairly easy job of creating this snowy effect. So let’s get started. I thought about how we enjoyed the snow in the valley 3 yrs earlier and thought about creating the image and took a picture of Basantapur as my workpiece photo.
Let’s try and add a little snow to it.
Step 1:
Step 2. Create “Snow” layer filled with white.
Press CTRL-SHIFT-N to create new layer. Give it a name “Snow”.
Press SHIFT-F5 to fill new layer with white.
Step 3. Fill “Snow” layer with noise.
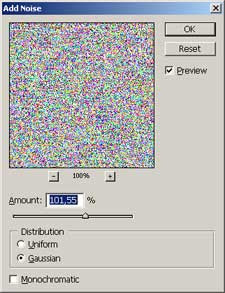
Select Filter – Noise – Add Noise.
Set Noise Amount to 100-150%, Gaussian distribution, Monochromatic NOT checked.

Step 4. Increase noise size.
Press CTRL-A to Select All, then CTRL-T to Transform.
Use numeric input in the upper part of the window, set vertical and horizontal scale to 150-200%.

Step 5. Set blending mode of “Snow” layer to “Screen”.
Step 6. Convert noise to snow.
Use Image – Adjustments – Threshold. Set Threshold amount to 200-240, depending on how much snow you want.
Select Filter – Blur – Gaussian Blur. Set Radius to 0,5 – 1 pixels. Do not blur snow too much at this step.
My values are: Threshold – 243, Gaussian blur – 0,6 pixels.
Step 7. Make snow fall.
Select Filter – Blur – Motion Blur. Set Distance to 8-12 pixels and try various directions.
| Step 8. Ideas for further adjustments. Image after some editing: |
- Create “Snow – 2″ layer for small-sized snow using technique explained above, but do not increase noise size (as in Step 4) and set Threshold to 230-240 to have little amount of snow.
- Try to set opacity of “Snow” and “Snow – 2″ layers to 60-80%.
- Make some areas less “snowy”. There are two ways to do that, “simple” and “advanced”. Simple way is to use Eraser tool in Brush mode with opacity set to 20-30% and remove snow from areas where it is unwanted.
Advanced way is using layer mask; it’s non-destructive as you do not delete anything but simply hide it. Select
Layer – Layer Mask – Reveal All, then take large soft brush, set brush opacity to 20-30%, press D to set foreground color to black and paint over the areas where you want to hide snow. Set brush color to white to reveal snow again.


No comments:
Post a Comment